Preserve Your Files: A Step-by-Step Guide to Successfully Performing a Windows 11 In-Place Update Without Losing Personal Data

Preserve Your Files: A Step-by-Step Guide to Successfully Performing a Windows 11 In-Place Update Without Losing Personal Data
Key Takeaways
- An in-place upgrade allows you to reinstall and upgrade Windows without losing your personal files, apps, and settings.
- Before performing an in-place upgrade, create a system image backup and ensure your computer is plugged in and connected to a stable internet connection.
- To perform the in-place upgrade, download the Windows 11 ISO, mount it, run “setup.exe,” choose “Keep personal files and apps,” and follow the prompts.
When reinstalling Windows 11, you might worry about what will happen to your files, apps, and settings. Luckily, there’s a way to reinstall Windows without losing your personal data. We’re going to show you how to perform an in-place upgrade.
What Is an In-Place Upgrade?
An in-place upgrade is a way to reinstall and upgrade your Windows installation to the latest version without deleting any of your personal files, apps, and settings. This comes in handy when you’re experiencing a problem on Windows that generic fixes, such as performing an SFC scan , using a system restore point , and using Windows Update, can’t seem to fix.
An in-place upgrade also helps if you want to upgrade from, for example, Windows 11 Home to Windows Pro, without performing a clean installation.
Before You Perform Your Windows 11 In-Place Upgrade
An in-place upgrade can change many things on your computer and occasionally the process can go wrong. To protect yourself, you must create a backup before you proceed. A good way to do this is to create a system image backup , which creates a snapshot of your hard drive, allowing you to restore your PC to a working state.
If you’re using a laptop, make sure you’ve plugged it into a power outlet, and that it’s charging. The last thing you want is for it to turn off in the middle of the in-place upgrade, which can cause further problems on your Windows PC.
Another thing you should do is make sure that you’ve logged in to Windows with an administrator account. Also, ensure that you’re using a stable and fast internet connection; you’ll need it to download the Windows 11 ISO file and complete the installation.
How to Perform the Windows 11 In-Place Upgrade
To start the in-place upgrade, download the Windows 11 ISO directly from the Microsoft website . After you download the ISO file, right-click it, and select “Mount.”
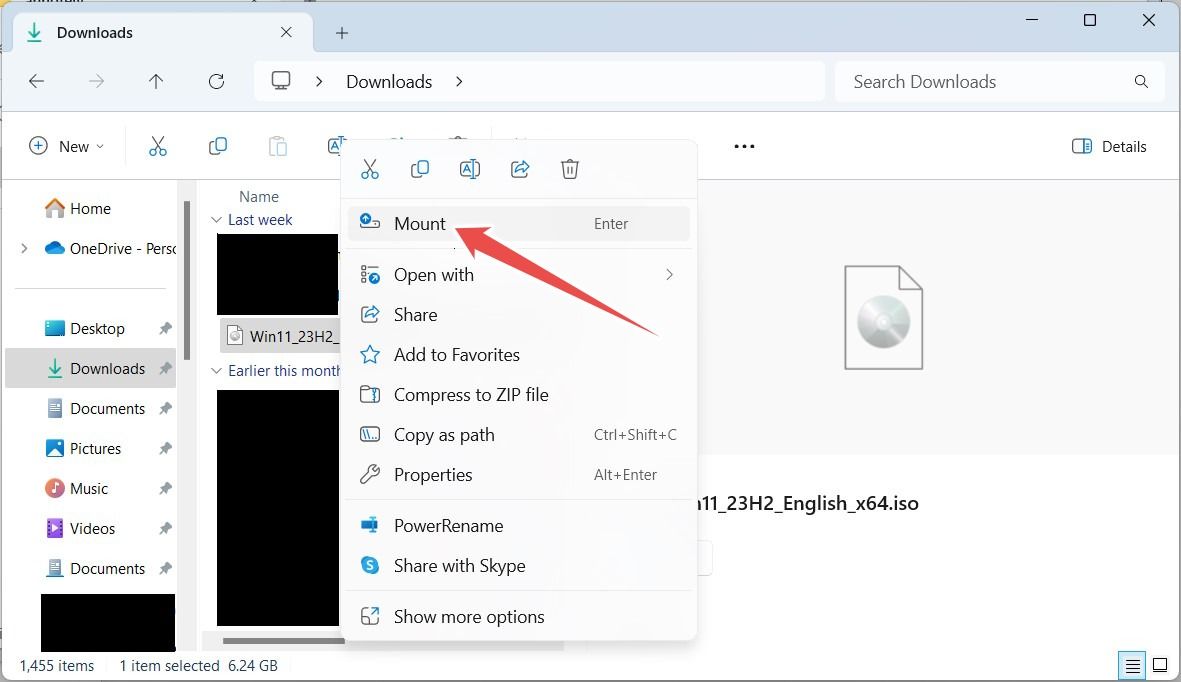
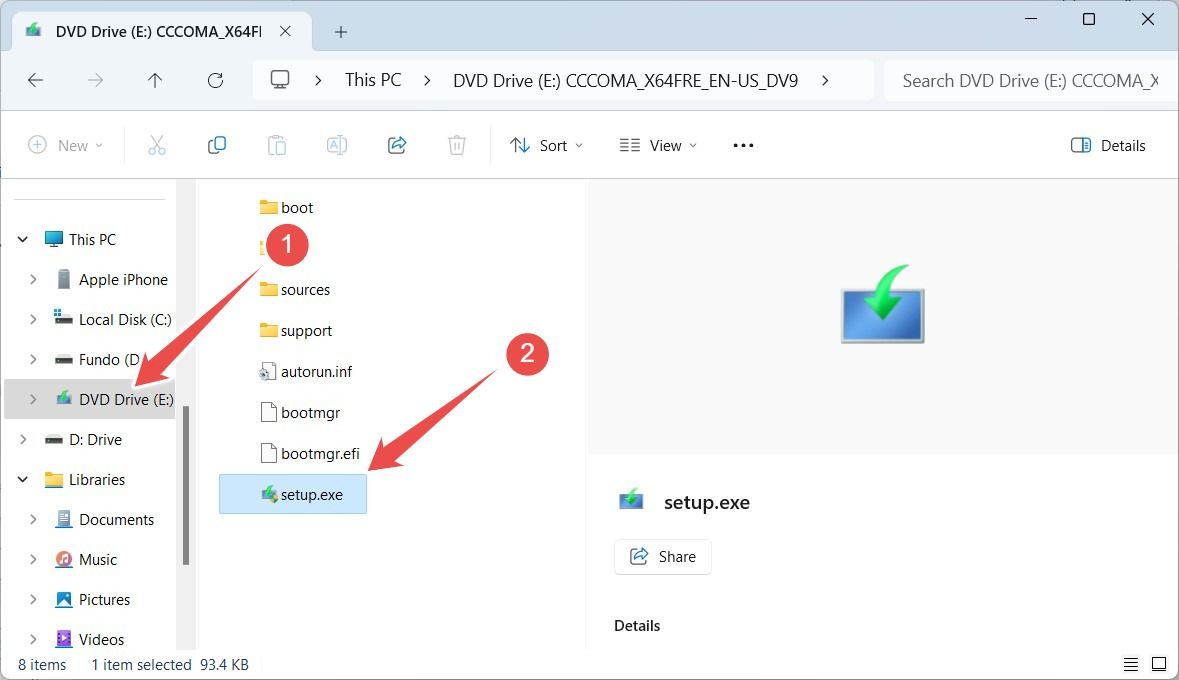
Mounting the ISO will allow you to access the files and folders contained therein. The mounted ISO will appear as a DVD drive under “This PC” in the navigation pane. Now, select the mounted ISO and double-click “setup.exe.”
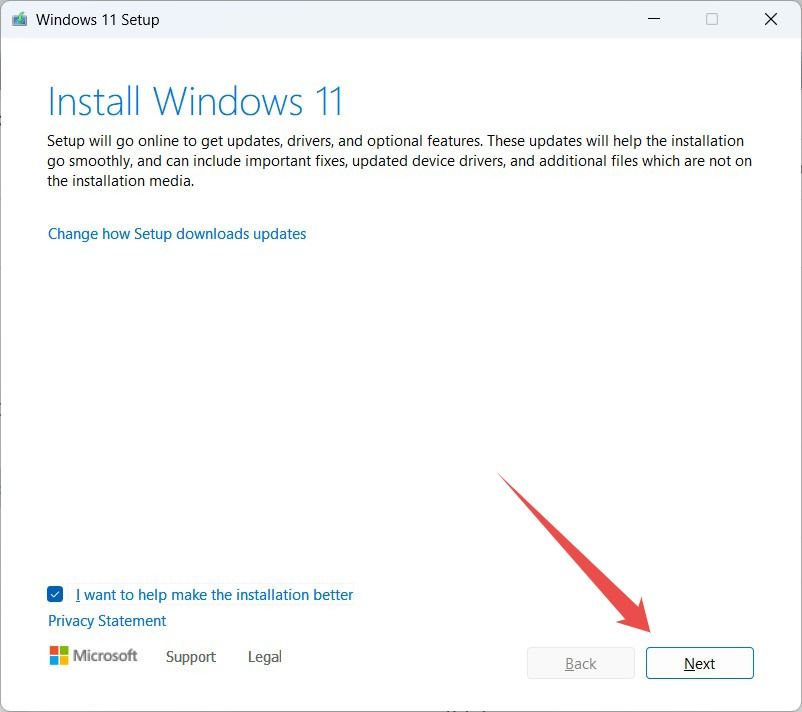
You will get a prompt from the UAC, so click “Yes” to bypass it. When Windows 11 Setup (the wizard that will guide you in upgrading Windows) launches, click “Next.”
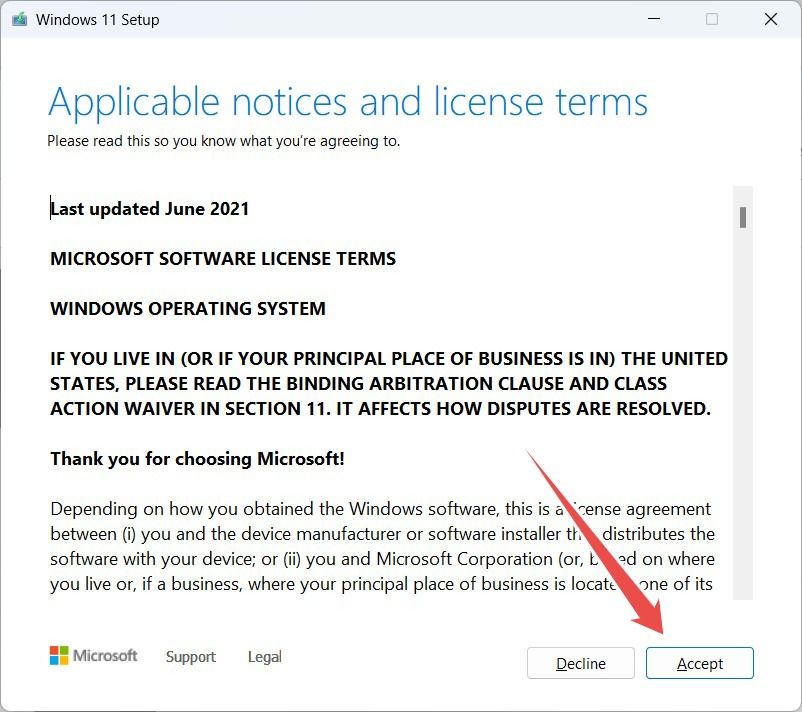
Setup then checks for updates. Once it finishes, it restarts and picks up where it left off. Next, take a moment to review the applicable notices and license terms, and click “Accept” when you’re done.
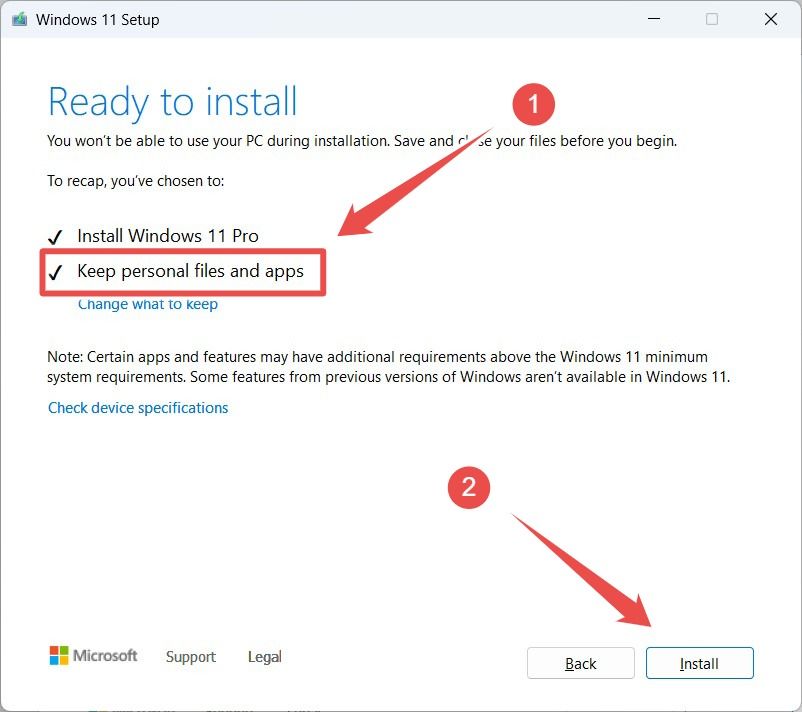
Setup checks for updates again, and once it finishes, it shows you the “Ready to install” screen. Here, make sure one of the checked items is “Keep personal files and apps.” If it is, go ahead and click “Install.”
If it’s not one of the checked items, click “Change what to keep”. On the next screen, select the “Keep personal files and apps” radio button, and then click “Next.”
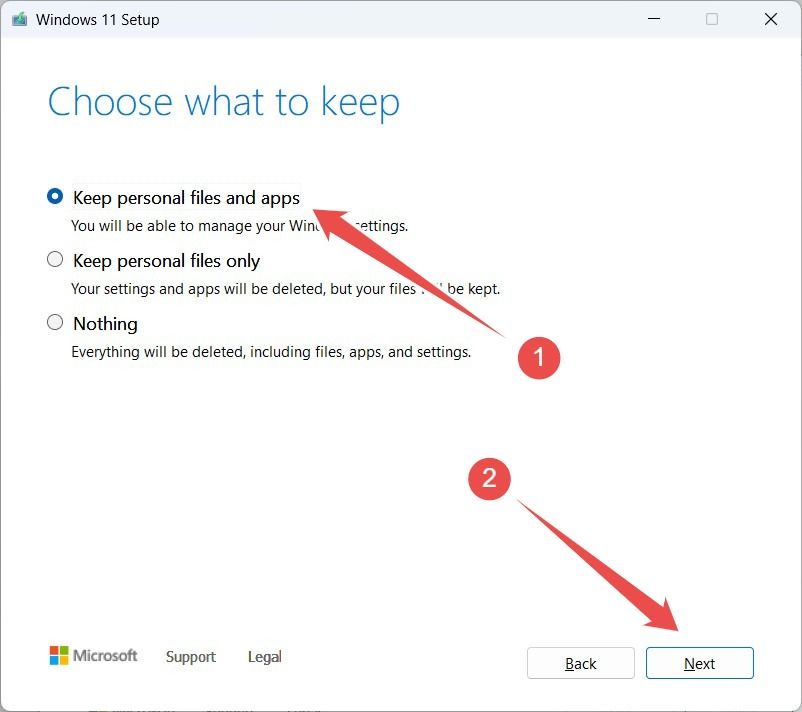
Back on the “Ready to install” screen, click “Install” to start upgrading your Windows version.
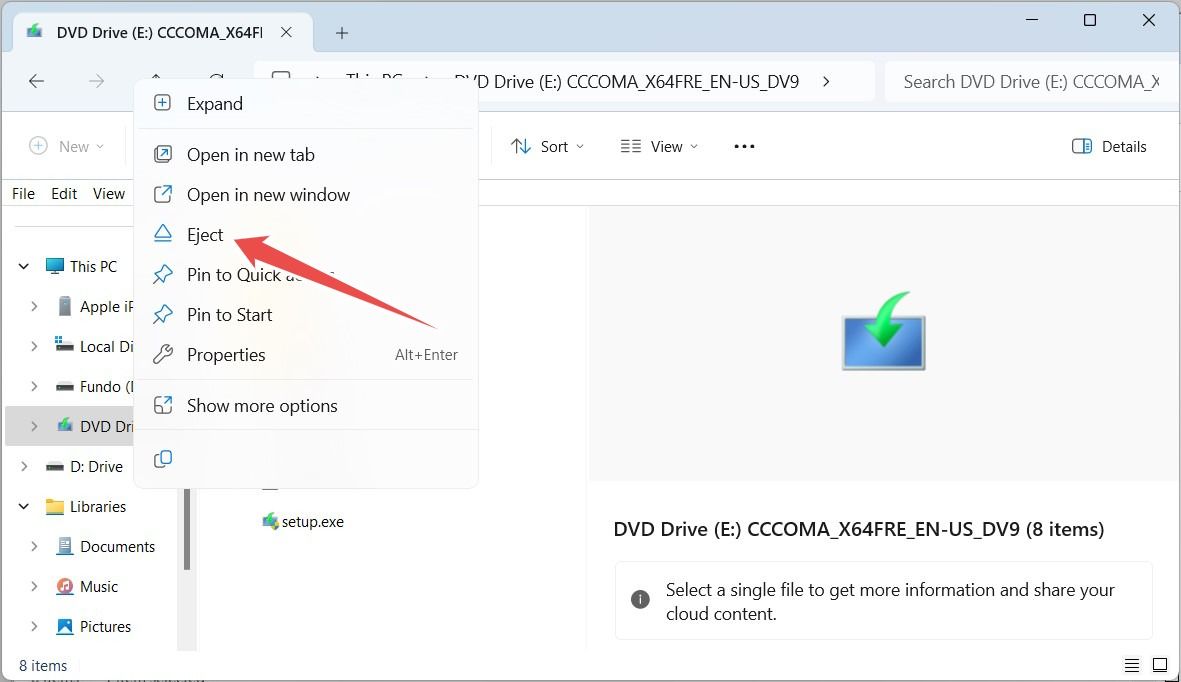
Once the installation of the latest Windows 11 version completes, and you’re able to log back into your computer, you can unmount the ISO. To do that, right-click on it in the navigation pane (remember that it will appear as the DVD drive) and select “Eject.”
If you look around, you’ll notice that your files, apps, and settings are still intact, even after reinstalling Windows.
What to Do When the In-Place Upgrade Is Stuck
You may experience a problem where setup gets stuck on the “Getting updates” or “Making sure you’re ready to install” screen. If that happens, make sure that there isn’t an issue with your Wi-Fi network. If there is, there are a couple of things you can do to fix Wi-Fi network problems on Windows .
If your network is working perfectly, you can try performing the in-place upgrade without having it download any of the updates.
Skipping the updates can mean that some functions and drivers won’t work properly until you install the necessary updates later on.
To do that, close setup and launch it again. On the “Install Windows 11” screen, click “Change how setup downloads updates”. In the “Get updates, drivers, and optional features” screen, select “Not right now,” and then click “Next.”
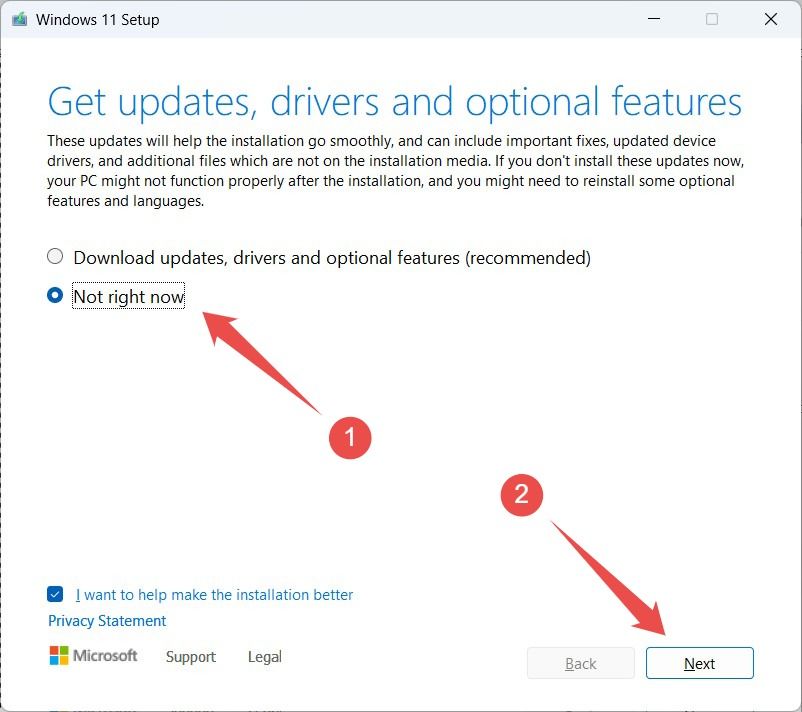
Now just follow the prompts to complete the in-place upgrade and hopefully it won’t get stuck again.
Just like that, you have successfully performed an in-place upgrade. You should check to see if you’re still experiencing the issue that caused you to do this in the first place. If it persists, consider performing a clean install instead.
Also read:
- [New] 5 Ultimate Platforms for High-Quality Text Embellishments
- [New] Review of Huawei P10’s Multimedia Features & Functionality
- [Updated] 2024 Approved Download YouTube Snippets with Perfection
- [Updated] Best Free WebM Players How to Play WebM Video Files?
- [Updated] Navigating Picture-in-Picture Settings for iPhone & iPad for 2024
- [Updated] Top 2 Methods to Transform Zoom Sound, Ensuring Clarity for 2024
- 2024 Approved MemeMorph Machine 2.0
- 2024 Approved Pondering the Value of Intensified Luminosity in HDR
- Audio Malfunctioning on PC? Effortless Fixes Inside
- Downloading SamFw FRP Tool 3.0 for Samsung Galaxy F15 5G
- Estimating a 20MB Videoclip Duration for 2024
- Expert Analysis of Plugable's Versatile 11-in-1 Dual HDMI Dock Expander: A Must-Have Upgrade for Efficient Windows Operations
- In 2024, Essential Wedding Countdown Clock Apps Top 10 Picks (Android/iOS)
- Unleash Your Imagination: Writing Beautiful Poems with Help From ChatGPT
- Title: Preserve Your Files: A Step-by-Step Guide to Successfully Performing a Windows 11 In-Place Update Without Losing Personal Data
- Author: Edward
- Created at : 2025-01-21 00:30:27
- Updated at : 2025-01-23 18:37:41
- Link: https://vp-tips.techidaily.com/preserve-your-files-a-step-by-step-guide-to-successfully-performing-a-windows-11-in-place-update-without-losing-personal-data/
- License: This work is licensed under CC BY-NC-SA 4.0.