
Step-by-Step Guide: Repairing Malfunctioning Widgets on Windows 11

Step-by-Step Guide: Repairing Malfunctioning Widgets on Windows 11
Key Takeaways
- Is Win+W not working? Go to Personalization > Taskbar. Under “Taskbar Items,” toggle “Widgets” on, then try to access widgets through the taskbar icon.
- Restart the Widgets service through Task Manager and ensure you have Edge WebView2 and Windows Web Experience Pack installed.
- Switch to a Microsoft account and consider performing a clean install of Windows if issues persist.
Widgets on Windows are a great way to quickly check information or access key features. But if you find that the widgets aren’t working, you can easily fix the problem. We’re going to show you several ways to cure your widget woes and have them back up and running in no time.
1. Preliminary Fixes
The first thing you need to do when widgets aren’t working is to restart your computer. If that doesn’t work, try updating Windows 11 to see if Microsoft has rolled out a patch. Also, make sure that your computer is connected to the internet , and that you have a stable connection in case the widgets are misbehaving because of internet connectivity issues.
Another thing you can try is running an SFC and DISM scan , which can fix any issues related to damaged or missing system files. Also, be sure to scan your Windows PC for viruses in case malware is the cause.
2. Access Widgets Through the Taskbar
An easy way to view your widgets is to press Win+W. But perhaps there’s a problem with this shortcut.
To check if that is the case, press Win+i to open Settings, and then head to Personalization > Taskbar. Under “Taskbar Items,” make sure the toggle for “Widgets” is set to “On.”
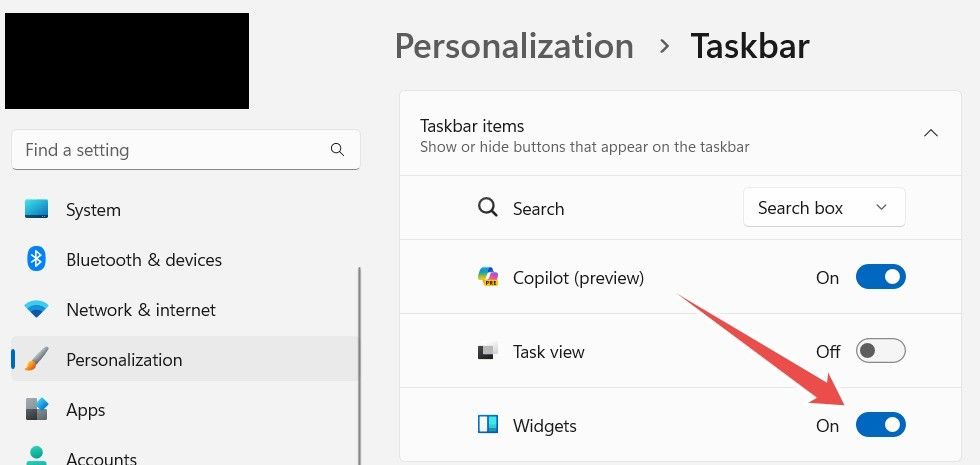
If it is set to “Off,” click it to turn it on. Click the widgets icon from your taskbar and, with any luck, your widgets will start working again.
3. Restart the Widgets Service
When the Widgets service is running perfectly, it manages your widgets and widget board with ease. However, if it malfunctions, you can find that your widgets are no longer working. You can fix that easily by restarting the service.
To do that, right-click an empty part of the Taskbar and select “Task Manager.”
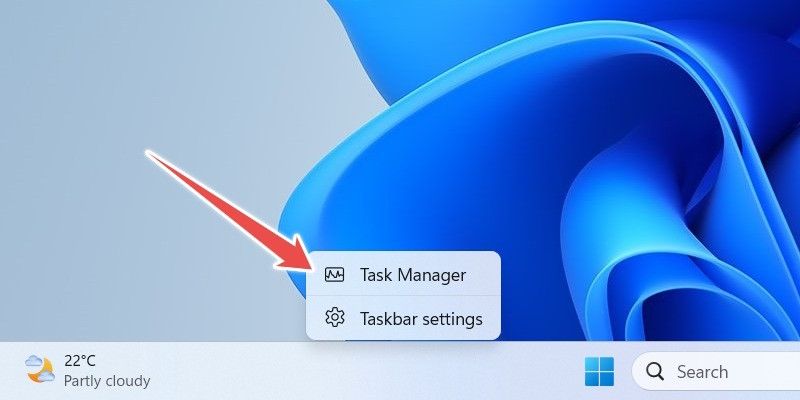
Select the “Processes” tab on the left side menu, right-click “Widgets.exe” in the right panel, and select “End Task” in the menu that appears.
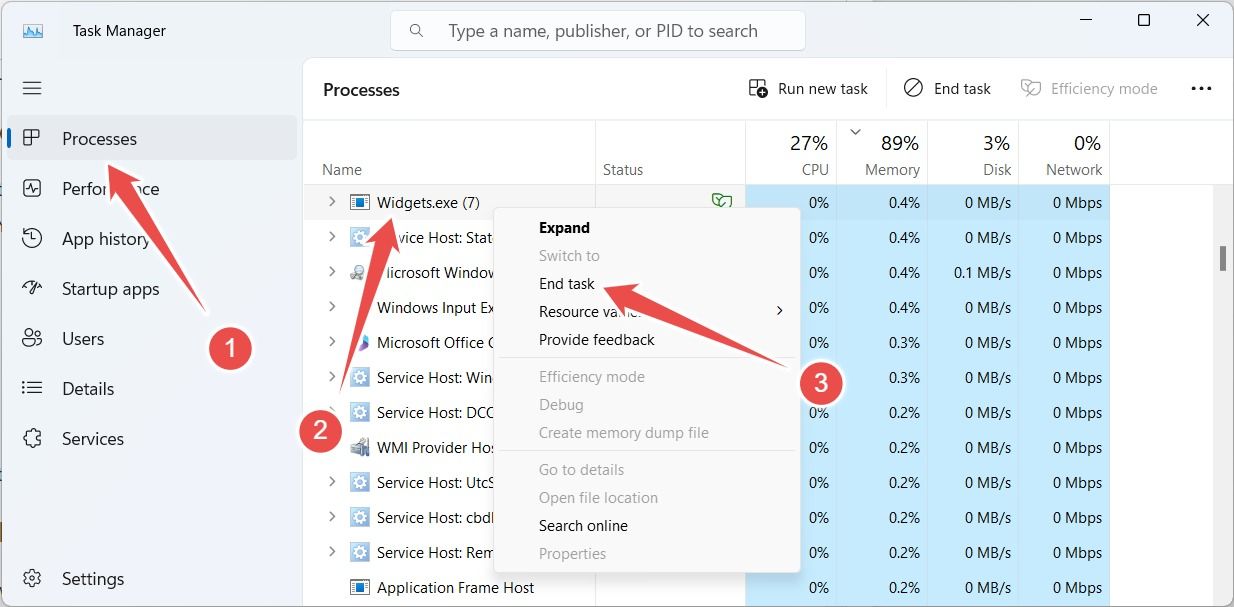
This will stop the Widgets service. Wait a few seconds and it restarts automatically, hopefully resolving the issue.
4. Install Microsoft Edge WebView2
In Windows 11, widgets use a feature known as Edge WebView2 to display web content using the rendering capabilities of the Chromium engine that powers Microsoft Edge. If your computer is missing this feature, widgets (as well as some native apps) will not work as they should. You will most likely experience some missing or non-functioning graphical elements, particularly if they’re web-based.
Fortunately, if this is the problem, you can easily install Edge WebView2 manually. To do that, go to the Microsoft Developer website , then download and install Edge WebView2.
5. Install Windows Web Experience Pack
Windows Web Experience Pack helps widgets function properly by keeping their web components up-to-date. Your computer should already have it installed if you’re using the latest version of Windows 11. But if it doesn’t, you can head to the Microsoft Store and install it.
If you already have Windows Web Experience Pack installed, it could be outdated and cause the widgets not to work. To fix that, press Win+S to open Start, then search for and open “Microsoft Store”.
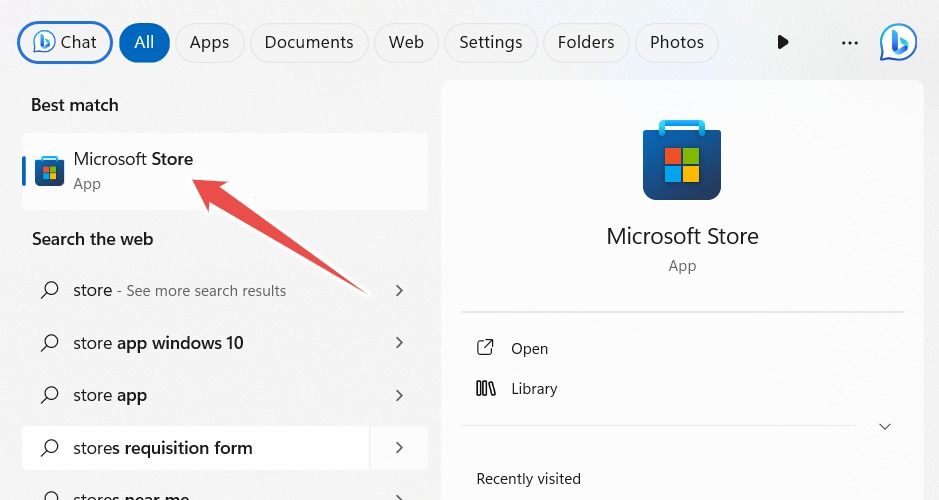
In the Microsoft Store, click “Library” in the bottom-left corner, find “Windows Web Experience Pack,” and click “Update.”
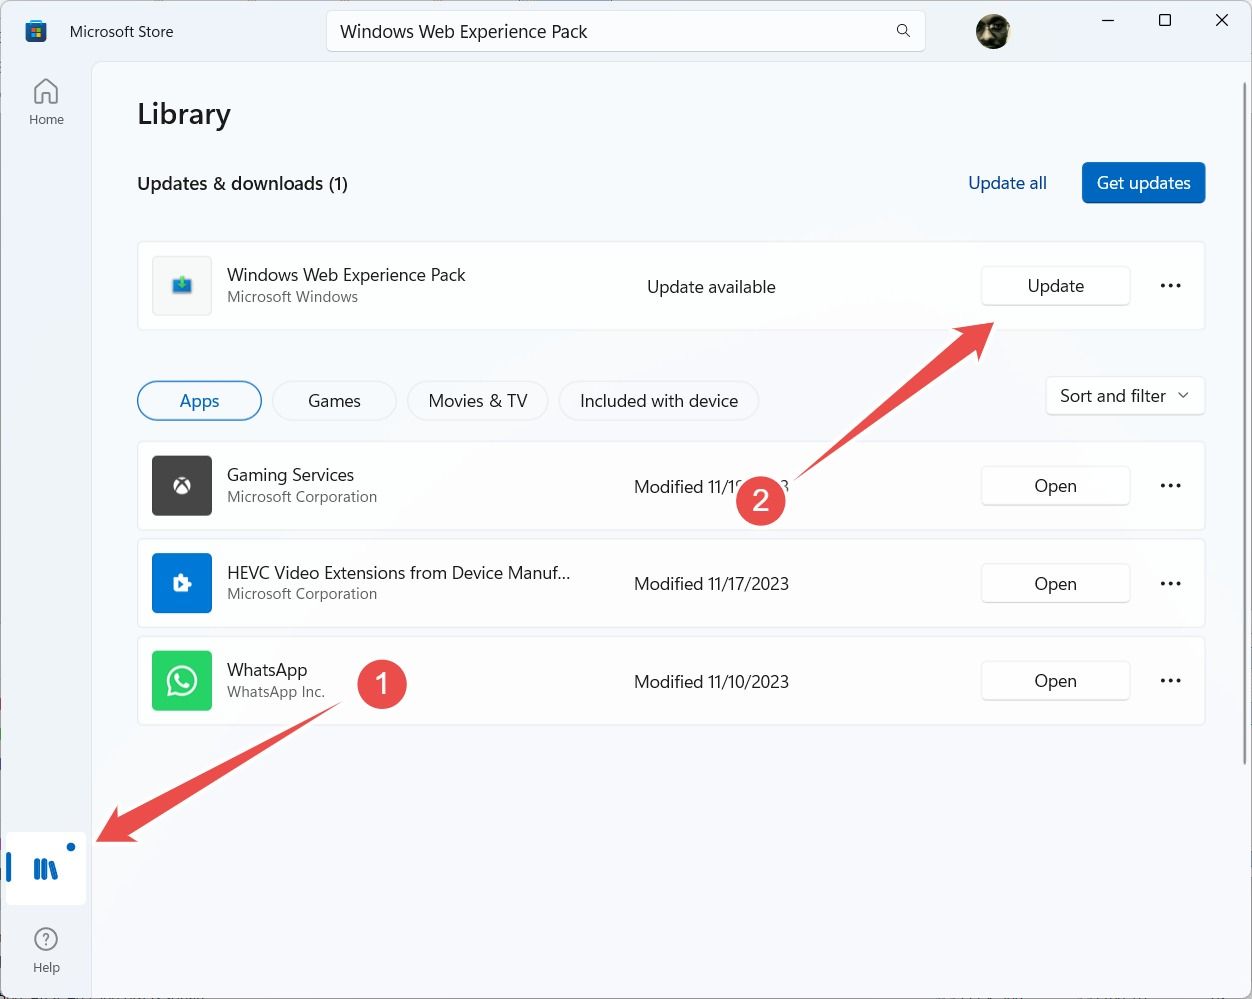
After you install or update Windows Web Experience Pack, check to see if your widgets are working properly.
6. Switch to a Microsoft Account
If you’re not using a Microsoft account with Windows , it could be the reason your widgets aren’t working. To switch from a local account to a Microsoft account, start by pressing Win+i to open Settings. Next, head to Accounts > Your info, and then click “Sign in with a Microsoft account instead.”
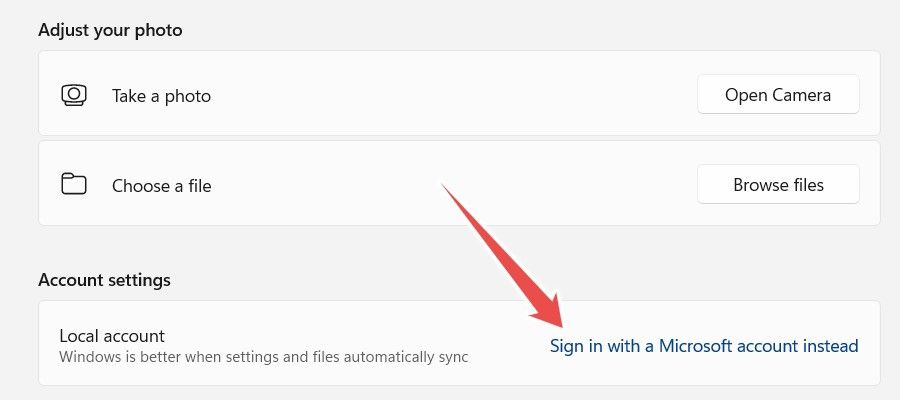
Then simply follow the instructions to sign in to your Microsoft account.
7. Reset Your Windows Computer
If you’re at this point, it means that the steps above may not have worked for you. If that is the case, perhaps resetting your Windows 11 PC can help. By returning the operating system to its factory default settings, you can hopefully get rid of the problem that’s preventing your widgets from working.
8. Perform a Clean Install
If resetting the OS didn’t help, then you could try performing a clean installation of Windows . The difference between a reset and a clean installation is that while the former will keep some settings intact, a clean installation will wipe everything, giving you Windows 11 with a blank slate.
The added benefit of a clean installation is that it gives you the opportunity to upgrade your version of Windows 11 to the latest one. This upgrade might come with bug fixes, performance enhancements, and new features that can enhance your experience with widgets. This is on top of addressing any issues you may be experiencing with the widgets.
9. Use a Third-Party Widgets App
If you don’t want to reset your computer or do a clean install, then perhaps you can try installing some third-party widget apps and using those instead. A good one to try is Widget Launcher , which comes with widgets like Calendar, Weather, RSS Feed, and Slideshow, and allows you to pin them to the desktop.
It can be frustrating when the widgets you rely on suddenly stop working. Hopefully, you’ll be able to fix the issue before resulting to resetting your computer. Also, remember that you can use a workaround, such as Widget Launcher, to avoid the nuclear option.
Also read:
- [New] 2024 Approved Pushing Boundaries in Visual Storytelling with HDR
- [New] Effortless Techniques for Second-Rate Signature Cleanup for 2024
- [New] Epic Echoes Academy – Superlative Seventeen
- [New] Mastering PIP A Complete Overview on Edge Browser
- [Updated] In 2024, Expertise in HDR Perfecting Dynamic Range in Photoshop
- [Updated] In 2024, Hilarious YouTube Moments Top 10 Quirky Short Film Concepts
- [Updated] In 2024, Vapor 3 Showdown Veil 4 Steps Forward
- Brighten Your Surroundings with 21+ Collage Wonders for 2024
- Cómo Revivir Tu Datos: Dos Métodos Innovadores Para Recuperar La Partición Desaparecida De Un Disco Duro
- Enhancing Your Content 10 Exceptional Reacting Techniques for 2024
- From Capture to Share A Quick Guide to Instagram Video Uploads on Desktop for 2024
- In 2024, How to Watch Hulu Outside US On Xiaomi Redmi A2 | Dr.fone
- Minimizing AI Illusions: Leveraging Six Guiding Prompts
- Read This Guide to Find a Reliable Alternative to Fake GPS On Apple iPhone 8 | Dr.fone
- Unlocking New Convenience: Adjusting Settings on Roku TV via Touchscreen Options
- Title: Step-by-Step Guide: Repairing Malfunctioning Widgets on Windows 11
- Author: Edward
- Created at : 2025-01-18 00:16:41
- Updated at : 2025-01-23 20:03:55
- Link: https://vp-tips.techidaily.com/step-by-step-guide-repairing-malfunctioning-widgets-on-windows-11/
- License: This work is licensed under CC BY-NC-SA 4.0.